> ## Documentation Index
> Fetch the complete documentation index at: https://semgrep-ee9d73d8-mintlify-b75b9a88.mintlify.site/llms.txt
> Use this file to discover all available pages before exploring further.
# Write rules using Semgrep Editor
**Semgrep Editor** allows you to write rules, verify their performance through tests, and add them to your organization’s [Policies page](/semgrep-code/policies) to enforce code standards and increase code security.
The Editor is free to use on all subscription tiers.
## Access Semgrep Editor
Sign in to your [Semgrep AppSec Platform account](https://semgrep.dev/login).
Click **Rules > Editor**.
Do any of the following steps:
i. To create a new rule, click on the **(+) plus sign** or **Create new rule** button.
ii. To open any rule you’ve recently edited, select it from the **Recent** list.
iii. To view a sample rule, select it from the **Examples** list. The rule renders within the Editor.
iv. To start a tutorial or read the docs, select it from the **Learn** list. This navigates you away from the Editor.
## View a rule
Semgrep Editor is composed of three panes and a top menu.
**Library**
View and open rules owned by your organization or available through the [Semgrep Registry](https://semgrep.dev/r).
**Rule editor**
Enter your rule's YAML in this pane. This pane supports both structure and advanced modes. This pane also contains metadata editing functionality in Structure mode, and match review functionality in Advanced mode.
**Sample code**
Enter test code in this pane and click **Run** to verify that the rule performs as intended. A matches panel appears after Semgrep runs to display matches and tests.
**Top menu**
Save, share, and add your rule to one of your policies.
### Group Registry rules
By default, Semgrep Registry rules are grouped by **directory**. Most of these directories correspond to languages. The Library can also be grouped by **rulesets**, which are rules sorted by category, such as security, best practices, and frameworks.
To group by ruleset, right-click on the empty space on the registry's name entry and select **Group by ruleset**.
## Create a rule
To create a rule, click **Create rule** on the splash page or the **(+) sign** next to the Library label.
Semgrep Editor offers two rule-writing modes:
**Structure mode (beta)**
Structure mode is a hybrid interface that offers guidance for rule writing while supporting additional features the way advanced mode does.
**Advanced mode**
Advanced mode provides the minimum required YAML keys for a Semgrep rule. To complete the rule, you must fill in additional keys, such as pattern operators or metadata.
### Write a rule using structure mode (beta)
Structure mode is a UI-based ruled writing editor that guides you through the process of writing a rule.
Structure mode features include:
* **Match badges**: Match badges are visual indicators paired with pattern operators. The match badge shows the number of matches associated with each pattern operator.
* **Automatic indentation**: When adding a new pattern to a nested operator such as `patterns` or `pattern-either`, the editor automatically indents sub-patterns correctly.
* **Differentiation between patterns and pattern constraints**: A pattern is one of six different operators that describes zero or more locations in a rule. These include `pattern`, `any`, `all`, `inside`, `regex`, and `not`. You can combine these in prescribed ways, such as `any` and `all`, using range union and intersection, but they still define ranges. Pattern constraints describe Boolean constrains that must be met for a match to occur. If the constraint doesn't hold, then the ranges determined by the pattern operators aren't applicable.
* **Interoperability with advanced mode**: You can write a rule using structure mode and view or export it in YAML, or you can paste in the YAML for a rule and edit it with structure mode.
* **Drag and drop**" You can move around the elements of a rule using drag and drop.
* **Pattern disabling**: You can toggle individual patterns on or off for actions like testing.
To write a **search** rule using structure mode:
Ensure that you are in **structure** mode.
Select your first operator. Options include: `pattern`, `any`, `all`, `inside`, `regex`.
Specify the pattern if applicable. Example: `print("...")`.
Optional: specify a constraint by clicking on the **filter** icon.
i. Specify whether the constraint is `focus`, `comparison`, or `metavariable`.
ii. Provide the pattern for the code for which the constraint should be applied.
Select the child operator and specify its pattern, if applicable. You can add as many child elements as you need. These child elements can also have their own constraints.
Optional: Expand the **Rule info** panel, and update the following fields:
i. Rule ID: the name of the rule
ii. Language: the language of the code for which this rule runs against
iii. Severity: the severity level of the finding if this rule generates a match
iv. Message: the message to print with the finding if this rule generates a match
Click **Run** or press Ctrl+Enter (⌘+Enter on Mac).
To write a **taint** rule using structure mode:
Ensure that you are in **structure** mode. and that you have selected **taint**.
Define your **Sources**.
i. Select your first operator. Options include: `pattern`, `any`, `all`, `inside`, `regex`.
ii. Specify the pattern if applicable. Example: `print("...")`.
iii. Optional: specify a constraint by clicking on the **filter** icon.
a. Specify whether the constraint is `focus`, `comparison`, or `metavariable`.
b. Provide the pattern for the code for which the constraint should be applied.
Define your **Sinks**.
i. Select your first operator. Options include: `pattern`, `any`, `all`, `inside`, `regex`.
ii. Specify the pattern if applicable. Example: `print("...")`.
iii. Optional: specify a constraint by clicking on the **filter** icon.
a. Specify whether the constraint is `focus`, `comparison`, or `metavariable`.
b. Provide the pattern for the code for which the constraint should be applied.
Add **Sanitizers**.
i. Select your first operator. Options include: `pattern`, `any`, `all`, `inside`, `regex`.
ii. Specify the pattern if applicable. Example: `print("...")`.
iii. Optional: specify a constraint by clicking on the **filter** icon.
a. Specify whether the constraint is `focus`, `comparison`, or `metavariable`.
b. Provide the pattern for the code for which the constraint should be applied.
Optional: Expand the **Rule info** panel, and update the following fields:
i. Rule ID: the name of the rule
ii. Language: the language of the code for which this rule runs against
iii. Severity: the severity level of the finding if this rule generates a match
iv. Message: the message to print with the finding if this rule generates a match
Click **Run** or press Ctrl+Enter (⌘+Enter on Mac).
### Write a rule using advanced mode
Advanced mode is a YAML editor that allows you to write rules using [Semgrep syntax](../writing-rules/rule-syntax/).
**RULES SYNTAX**
Refer to [Rule syntax](/writing-rules/rule-syntax) for all possible fields and values to create a rule.
To quickly learn Semgrep patterns and syntax, explore the Editor’s library of rules from the **public [Rule Registry](https://semgrep.dev/explore)**. Rules from the Registry can detect OWASP vulnerabilities, best practice violations, and security issues for a wide variety of languages and frameworks. Semgrep Editor enables you to **adapt these rules** for your own organization's use by [forking](#write-a-new-rule-by-forking-an-existing-rule) them.
To write a rule in advanced mode:
Ensure that you are in **advanced** mode.
Click the **plus sign** and select a template. The **New rule** template includes the minimum keys required for a Semgrep rule, but there are additional templates that can help you write more complex rules:
* **Metavariable-comparison**: demonstrates how to use [the `metavariable-comparison` key](/writing-rules/rule-syntax/#metavariable-comparison)
* **Metavariable-pattern**: demonstrates how to use [the `metavariable-pattern` key](/writing-rules/rule-syntax/#metavariable-pattern)
* **Dataflow analysis**: demonstrates how to leverage dataflow analysis through [`pattern-sources`](/writing-rules/data-flow/taint-mode/overview#sources), [`pattern-sinks`](/writing-rules/data-flow/taint-mode/overview#sinks), and [`pattern-sanitizers`](/writing-rules/data-flow/taint-mode/overview#sanitizers).
* **Dataflow analysis with taint labels**: demonstrates [how to define the sources you want to track and how data must flow](/writing-rules/data-flow/taint-mode/advanced#taint-labels-)
* **HTTP validators**: Demonstrates how to write [Semgrep Secrets rules](/semgrep-secrets/rules/) that include [validators](/semgrep-secrets/validators/)
Modify the template, adding and changing the keys and values needed to finish your rule.
Optional: Click **Metadata** to update and enter additional metadata fields.
Click **Run** or press Ctrl+Enter (⌘+Enter on Mac).
**SYNTAX ISSUES**
Semgrep Editor won't save or run your rule if it can't parse the YAML syntax of your rule. Fix any issues indicated by the red annotations before proceeding.
## Run and test a rule
After you write a rule, testing it ensures it performs as expected. To test a rule:
Create at least one **true positive**: a code sample intended to match the rule.
Above this potential match, create a comment, followed by a space (` `), followed by `ruleid:RULE_ID` which specifies the rule that should match. In the preceding example, this is `// ruleid:hardcoded-conditional`.
Create at least one **true negative**: a code sample intended not to match the rule.
Above this non-match, create a comment followed by a space (` `), followed by `ok:RULE_ID`. For example, `// ok:hardcoded-conditional`.
Optional: add more code samples with their corresponding annotations.
Click **Run**. Semgrep detects the annotations and validates the rule based on your tests.
In addition to testing for matches, you can test that your rule doesn't match what it shouldn't, preventing false positives. To do so, you can [create comment annotations for intended and unintended findings](/writing-rules/testing-rules/) in **test code**.
Once you've written a rule and created comment annotations, you can run your rule against your comment annotations by clicking **Run**. You can also press Ctrl+Enter (⌘+Enter on Mac).
## Code search (beta)
Code search allows you to test a Semgrep rule by running it against one or more GitHub repositories or projects instead of just a few lines of test code. Its results highlight all instances of matching code in those target repositories, allowing you to see whether your rule works as intended or not. This rapid feedback can help you develop more accurate and effective rules.
The [Semgrep Network Broker](/semgrep-ci/network-broker) does not support code search at this time.
### Prerequisites
* Code search is currently available to all paying customers of Semgrep Code.
* You must grant Semgrep code access by [installing the private Semgrep GitHub app](#install-the-private-semgrep-github-app-to-enable-code-access) if you would like to run code search against your repositories. Otherwise, you can run code search against public repositories.
#### Install the private Semgrep GitHub app to enable code access
The private app must be installed by a **GitHub organization administrator**. If you are not an admin, an installation link is provided for you to share with your GitHub admin.
Click ** Settings > Source Code Managers**.
Click **Register App**.
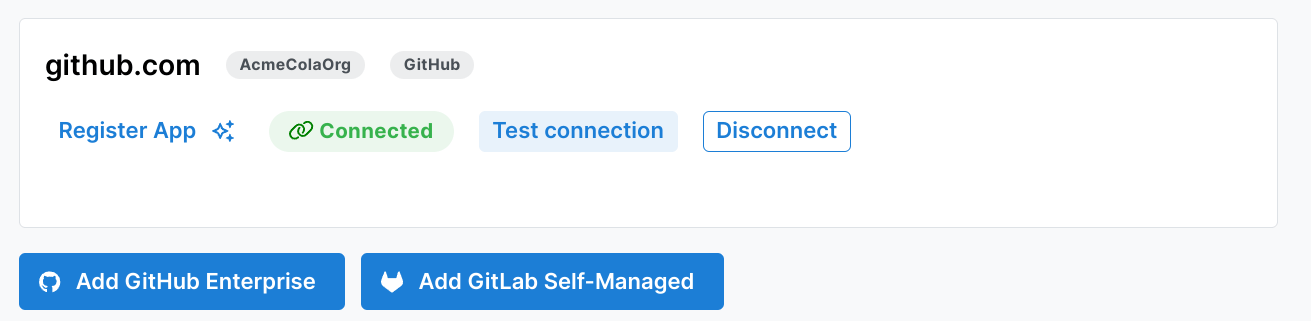 Follow the steps to install a private GitHub app in your org. Ensure that you enter your exact GitHub organization name and the correct type of GitHub account, typically **Organization**.
Click **Register GitHub App**.
If you are an admin on the GitHub organization, click **Continue**. Otherwise, share the provided link with your GitHub administrator.
Follow the steps to install a private GitHub app in your org. Ensure that you enter your exact GitHub organization name and the correct type of GitHub account, typically **Organization**.
Click **Register GitHub App**.
If you are an admin on the GitHub organization, click **Continue**. Otherwise, share the provided link with your GitHub administrator.
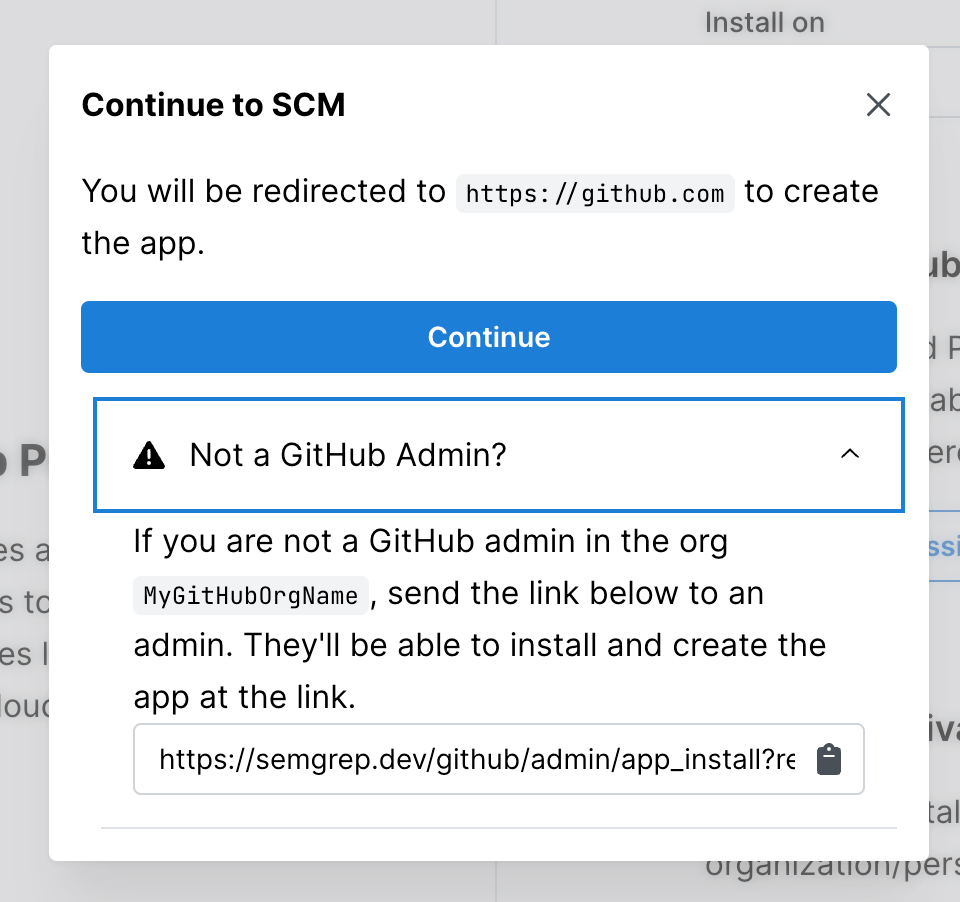 Follow the prompts in GitHub to install the private app. Ensure that you grant access to the repositories you want to scan.
**RUNNING INTO A 404?**
If you are brought to a GitHub 404 page, return to your [ GitHub Applications](https://github.com/settings/installations) page.
**INFO**
Code search currently works with repositories or projects hosted by GitHub.
To run your rule against selected repositories or projects:
Sign in to [Semgrep AppSec Platform](https://semgrep.dev/login).
Go to **Rules > Editor**, and open up the rule you want to test.
In the **code panel** click **live code**.
Select the repositories against which you want the rule to run. You can use the search bar to narrow down the list of repositories shown. Semgrep currently supports both public repositories and private repositories available to your Semgrep organization.
Optional: If you're running your rule against multiple repositories, select the **Limit to first result per repository** checkbox to see only the first result per repository. This speeds up your search and allows you to receive your results faster.
Click **Run** to start the search.
When the search completes, you'll see a list of results where the rule generated a finding when run against your codebase. The links, which include filenames and line numbers, take you to GitHub, where you can view and remediate the issue.
## Set a rule’s visibility and share a rule
Upon saving, a rule’s visibility is **private** by default. A private rule is visible only to members within an organization.
* To share a rule outside your organization, click **Share > Public > Confirm**. If you want to share this specific version of the rule, you can also toggle Permalink. This provides a shortlink to this version of the rule, which will not change if the rule is modified.
* To share a private rule with those who can access it, click **Share** and copy the **URL link**.
Some older rules in Semgrep AppSec Platform may be **unlisted** rather than private. These rules are marked with an icon without a lock, and can be shared with anyone, including those who cannot access Semgrep AppSec Platform.
To change an unlisted rule’s visibility to private for increased security, click **Share > Private > Confirm**.
## Rename a rule
To rename a rule, enter the new name in the YAML editor’s `id` field. The, save the rule by entering Ctrl+S (⌘+S on Mac) or clicking the **Save** button.
## Delete a rule
To remove a private rule, follow these steps:
In the [Semgrep Editor](https://semgrep.dev/orgs/-/editor), find the private rule to delete under the **Library** tab. Private rules are usually stored in the folder with the same name as your Semgrep AppSec Platform organization.
Click the rule you want to delete, and then click the three vertical dots.
Click **Delete**.
Deleting a rule is permanent. If the rule was previously added to the **Policies** page, it is removed upon deletion.
## Add a rule to the Policies page
The **[Policies](/semgrep-code/policies/)** page displays rules that Semgrep Cloud Platform uses to scan your project's code. Rules added to the **Policies** page become part of every Semgrep scan you run.
When adding a rule to your **Policies** page, you must also set the **rule mode** that determines what actions Semgrep performs when that rule generates a finding. See [Policies](/semgrep-code/policies/#block-a-pr-or-mr-through-rule-modes) for more information on each rule mode.
To add a rule to the **Policies** page:
Ensure you're [signed in to Semgrep](https://semgrep.dev/login).
Click **Add to Policy**.
Select one of the following rule mode options based on the relevance of the rule: **Monitor mode**, **Comment mode**, or **Block mode**.
If successful, you'll see a pop-up window indicating that your rule has been added.
## Organize private rules
All private rules for an organization are saved to the organization's folder. To further organize rules, consider organizational naming conventions to facilitate searching for and identifying rules. Useful naming conventions might include internal team, rule language, or vulnerability category.
## Semgrep Registry rules
The [ Semgrep Registry](https://semgrep.dev/explore/) is a community-driven repository of rules. These rules can detect OWASP vulnerabilities, best practice violations, and security issues for various languages and frameworks. You can fork an existing rule to use as a starting point for writing your own.
### Write a new rule by forking an existing rule
One way to create new rules is to fork an existing rule in the Semgrep Registry and modify it to meet your software and business requirements.
For example, Semgrep’s Java `crypto` ruleset prohibits the use of weak hashing algorithms `SHA-1` and `MD5`. However, your organization also prohibits the use of other hash functions as part of its standards or security compliance. The following steps illustrate the process of forking an existing `use-of-sha1` rule and changing it to forbid MD2 hashes.
Use the search bar to find relevant rules. For this example, you can search for rules using `SHA1`.
Follow the prompts in GitHub to install the private app. Ensure that you grant access to the repositories you want to scan.
**RUNNING INTO A 404?**
If you are brought to a GitHub 404 page, return to your [ GitHub Applications](https://github.com/settings/installations) page.
**INFO**
Code search currently works with repositories or projects hosted by GitHub.
To run your rule against selected repositories or projects:
Sign in to [Semgrep AppSec Platform](https://semgrep.dev/login).
Go to **Rules > Editor**, and open up the rule you want to test.
In the **code panel** click **live code**.
Select the repositories against which you want the rule to run. You can use the search bar to narrow down the list of repositories shown. Semgrep currently supports both public repositories and private repositories available to your Semgrep organization.
Optional: If you're running your rule against multiple repositories, select the **Limit to first result per repository** checkbox to see only the first result per repository. This speeds up your search and allows you to receive your results faster.
Click **Run** to start the search.
When the search completes, you'll see a list of results where the rule generated a finding when run against your codebase. The links, which include filenames and line numbers, take you to GitHub, where you can view and remediate the issue.
## Set a rule’s visibility and share a rule
Upon saving, a rule’s visibility is **private** by default. A private rule is visible only to members within an organization.
* To share a rule outside your organization, click **Share > Public > Confirm**. If you want to share this specific version of the rule, you can also toggle Permalink. This provides a shortlink to this version of the rule, which will not change if the rule is modified.
* To share a private rule with those who can access it, click **Share** and copy the **URL link**.
Some older rules in Semgrep AppSec Platform may be **unlisted** rather than private. These rules are marked with an icon without a lock, and can be shared with anyone, including those who cannot access Semgrep AppSec Platform.
To change an unlisted rule’s visibility to private for increased security, click **Share > Private > Confirm**.
## Rename a rule
To rename a rule, enter the new name in the YAML editor’s `id` field. The, save the rule by entering Ctrl+S (⌘+S on Mac) or clicking the **Save** button.
## Delete a rule
To remove a private rule, follow these steps:
In the [Semgrep Editor](https://semgrep.dev/orgs/-/editor), find the private rule to delete under the **Library** tab. Private rules are usually stored in the folder with the same name as your Semgrep AppSec Platform organization.
Click the rule you want to delete, and then click the three vertical dots.
Click **Delete**.
Deleting a rule is permanent. If the rule was previously added to the **Policies** page, it is removed upon deletion.
## Add a rule to the Policies page
The **[Policies](/semgrep-code/policies/)** page displays rules that Semgrep Cloud Platform uses to scan your project's code. Rules added to the **Policies** page become part of every Semgrep scan you run.
When adding a rule to your **Policies** page, you must also set the **rule mode** that determines what actions Semgrep performs when that rule generates a finding. See [Policies](/semgrep-code/policies/#block-a-pr-or-mr-through-rule-modes) for more information on each rule mode.
To add a rule to the **Policies** page:
Ensure you're [signed in to Semgrep](https://semgrep.dev/login).
Click **Add to Policy**.
Select one of the following rule mode options based on the relevance of the rule: **Monitor mode**, **Comment mode**, or **Block mode**.
If successful, you'll see a pop-up window indicating that your rule has been added.
## Organize private rules
All private rules for an organization are saved to the organization's folder. To further organize rules, consider organizational naming conventions to facilitate searching for and identifying rules. Useful naming conventions might include internal team, rule language, or vulnerability category.
## Semgrep Registry rules
The [ Semgrep Registry](https://semgrep.dev/explore/) is a community-driven repository of rules. These rules can detect OWASP vulnerabilities, best practice violations, and security issues for various languages and frameworks. You can fork an existing rule to use as a starting point for writing your own.
### Write a new rule by forking an existing rule
One way to create new rules is to fork an existing rule in the Semgrep Registry and modify it to meet your software and business requirements.
For example, Semgrep’s Java `crypto` ruleset prohibits the use of weak hashing algorithms `SHA-1` and `MD5`. However, your organization also prohibits the use of other hash functions as part of its standards or security compliance. The following steps illustrate the process of forking an existing `use-of-sha1` rule and changing it to forbid MD2 hashes.
Use the search bar to find relevant rules. For this example, you can search for rules using `SHA1`.
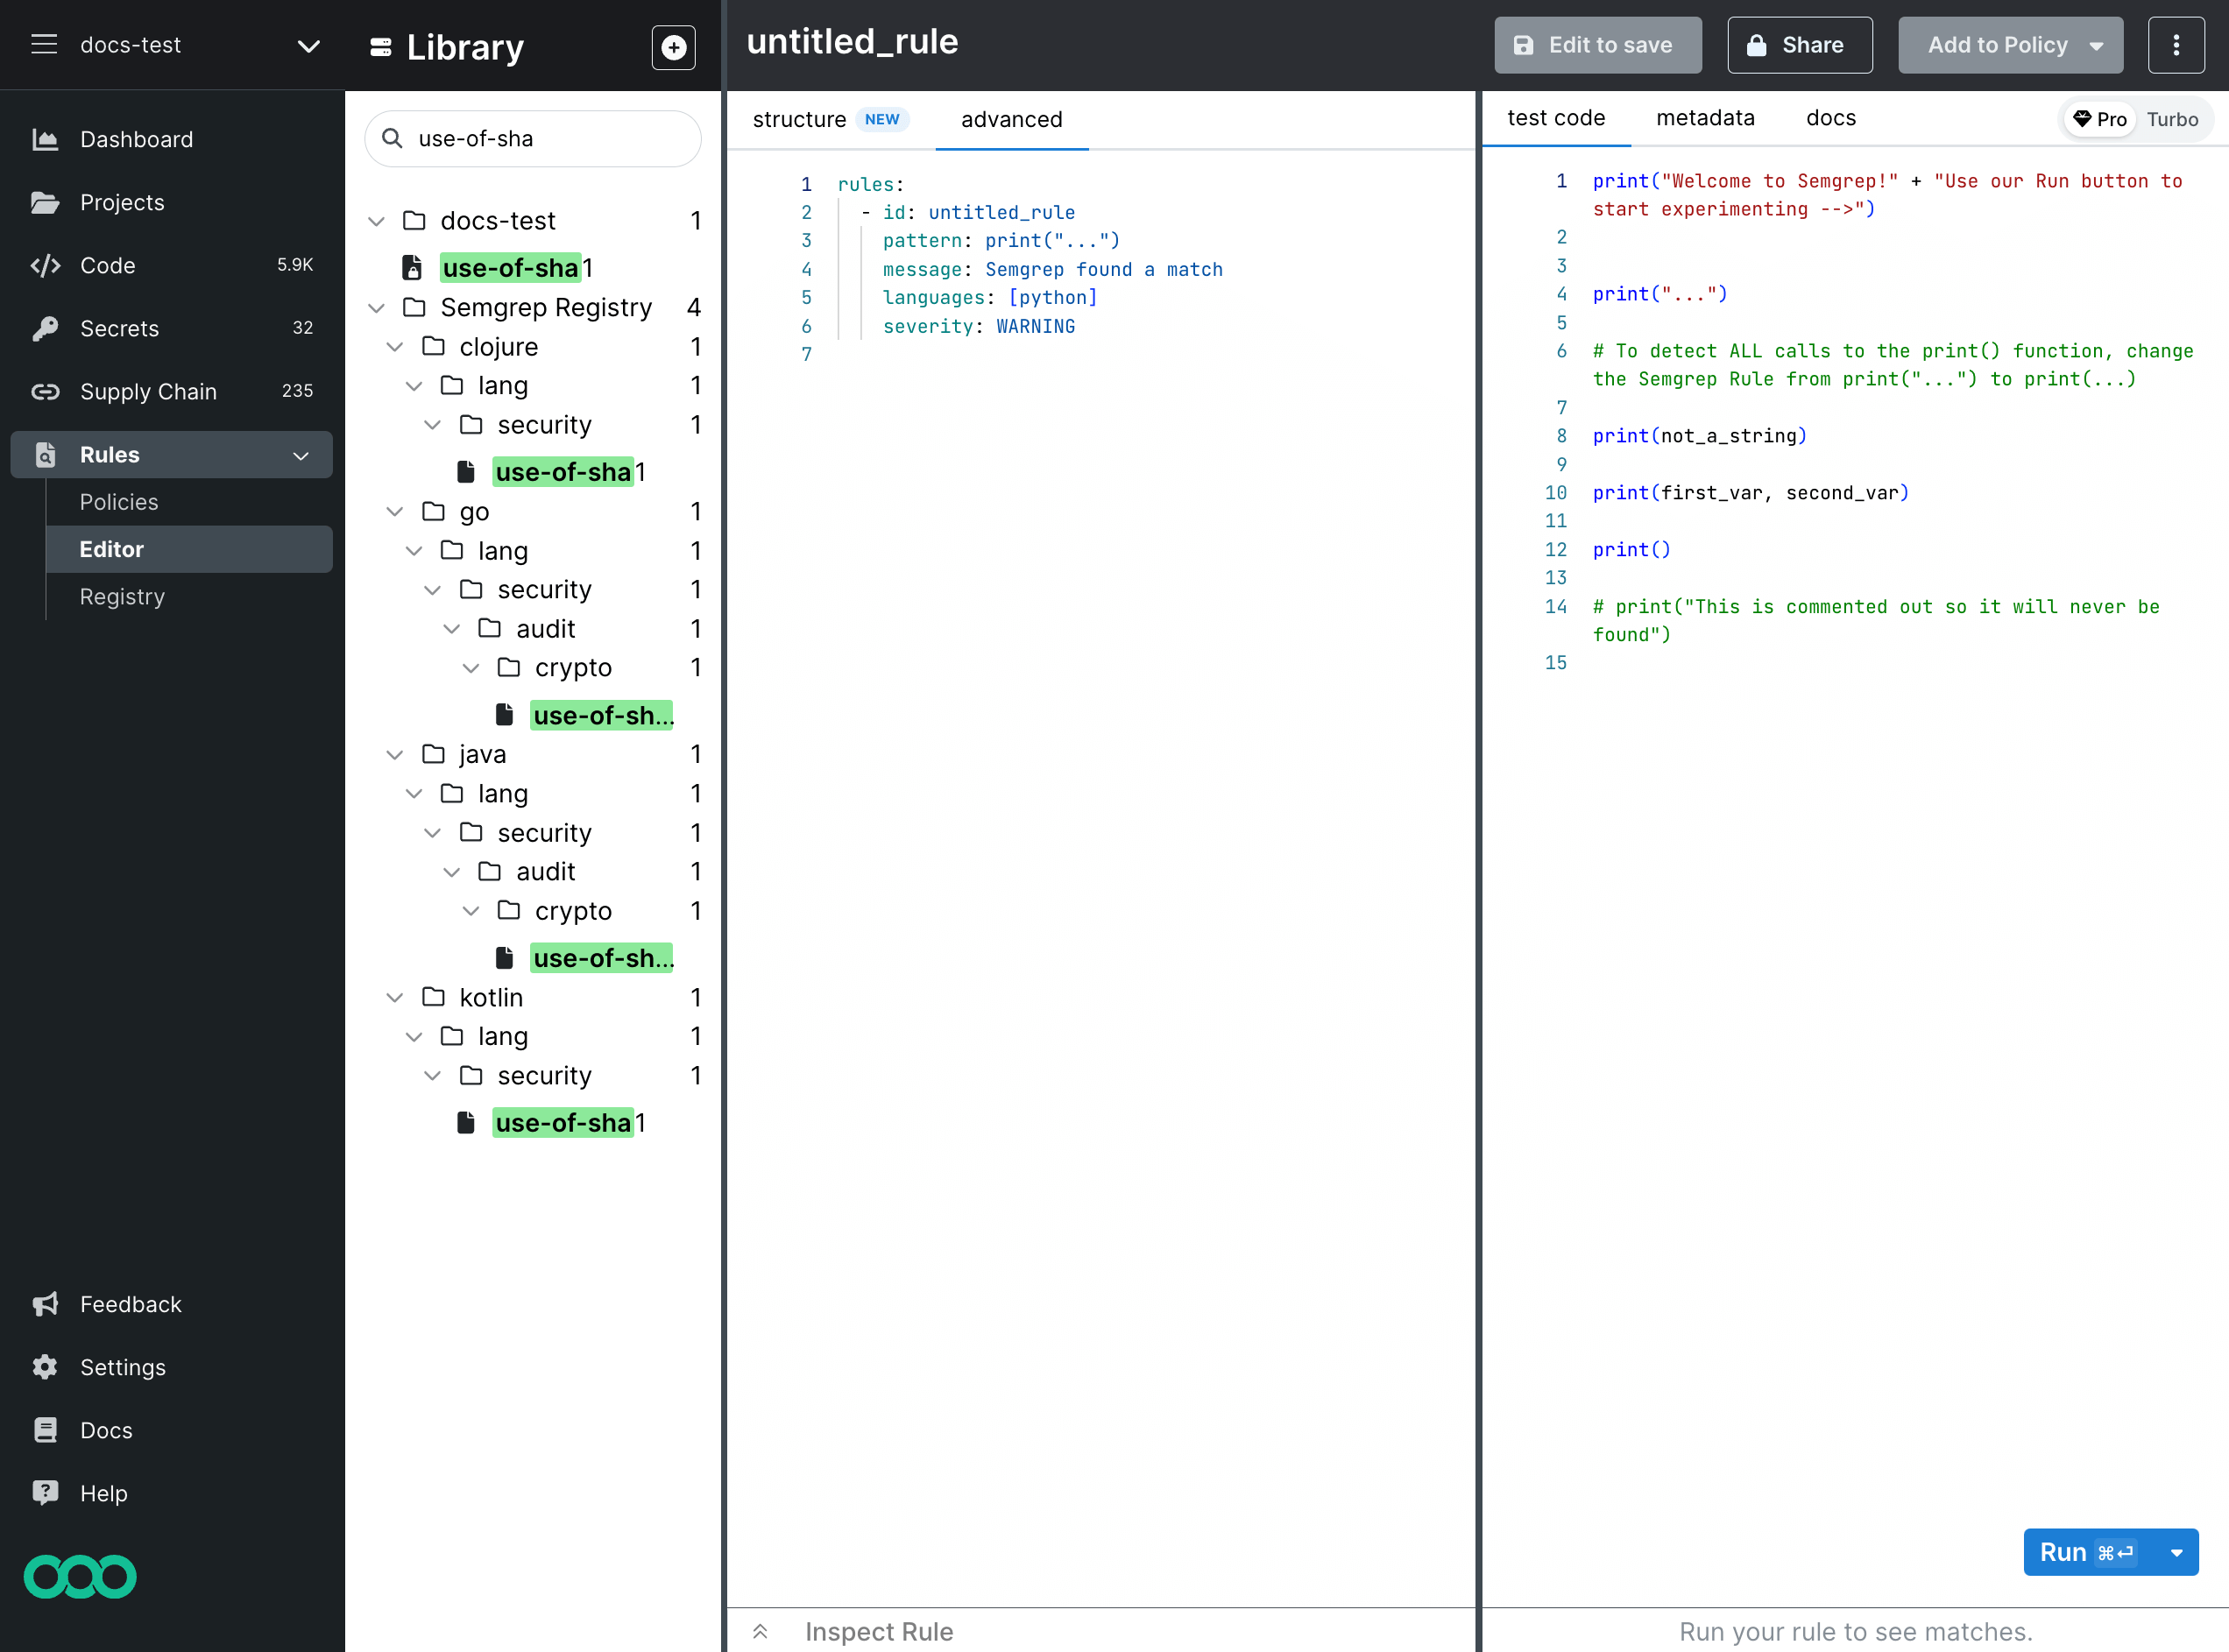 Under **java > lang > security > audit > crypto**, click **use-of-sha1** to load the rule. You cannot directly edit the rules in Semgrep Registry, so click **Fork** to make a copy.
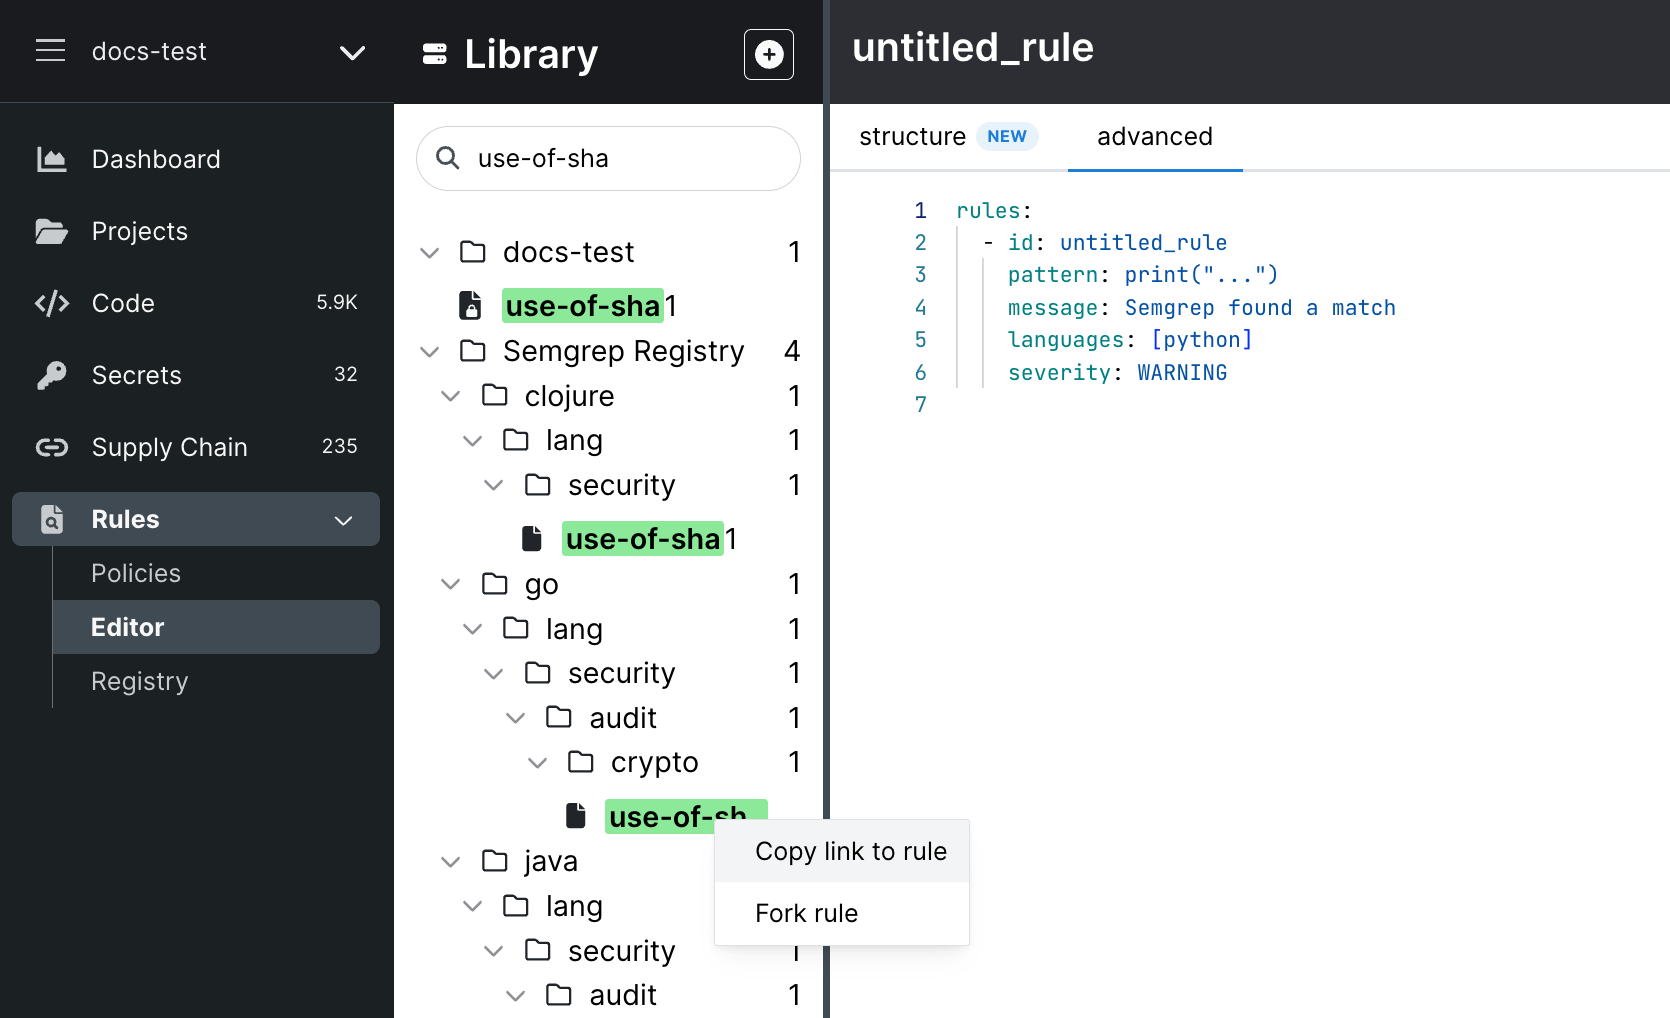 Alternatively, you can right-click the rule's name and select **Fork rule**.
Semgrep copies the rule to your organization's set of rules.
Edit the rule.
Update your test cases.
Click **Run** to test and validate your rule.
When you finish your changes, click **Save**.
The following example shows how [the original rule, identifying uses of `SHA-1` and `MD5`, has been modified to find uses of MD2](https://docs.oracle.com/javase/9/specs/security/standard-names.html#messagedigest-algorithms) and the severity of such findings is increased from `WARNING` to `ERROR`.
When you fork a rule, the copy is independent from the original. To run your new rule in your scans, [add it to a policy](/semgrep-code/policies#add-rules). If you want your copy to replace the rule you forked, add it to a policy, then disable the original on the Policies page.
### Contribute to the Semgrep Registry
**INFO**
For general contributing guidelines, see [Contributing rules](/contributing/contributing-to-semgrep-rules-repository).
To have your rule accepted faster, include the following:
* Include **test cases** for both a true positive and a true negative. See [Tests](/contributing/contributing-to-semgrep-rules-repository/#tests) for more details.
* Include a descriptive rule **message**. See [Rule messages](/contributing/contributing-to-semgrep-rules-repository/#rule-messages) for more information.
* Include **metadata fields**. See [Semgrep registry rule requirements](/contributing/contributing-to-semgrep-rules-repository/#semgrep-registry-rule-requirements) for more information.
To **create a PR** from the Semgrep Editor:
Click **Share**.
(Optional) Click **Publish to Registry**.
Fill in the required and optional fields.
Click **Continue**, and then click **Create PR**.
Alternatively, you can right-click the rule's name and select **Fork rule**.
Semgrep copies the rule to your organization's set of rules.
Edit the rule.
Update your test cases.
Click **Run** to test and validate your rule.
When you finish your changes, click **Save**.
The following example shows how [the original rule, identifying uses of `SHA-1` and `MD5`, has been modified to find uses of MD2](https://docs.oracle.com/javase/9/specs/security/standard-names.html#messagedigest-algorithms) and the severity of such findings is increased from `WARNING` to `ERROR`.
When you fork a rule, the copy is independent from the original. To run your new rule in your scans, [add it to a policy](/semgrep-code/policies#add-rules). If you want your copy to replace the rule you forked, add it to a policy, then disable the original on the Policies page.
### Contribute to the Semgrep Registry
**INFO**
For general contributing guidelines, see [Contributing rules](/contributing/contributing-to-semgrep-rules-repository).
To have your rule accepted faster, include the following:
* Include **test cases** for both a true positive and a true negative. See [Tests](/contributing/contributing-to-semgrep-rules-repository/#tests) for more details.
* Include a descriptive rule **message**. See [Rule messages](/contributing/contributing-to-semgrep-rules-repository/#rule-messages) for more information.
* Include **metadata fields**. See [Semgrep registry rule requirements](/contributing/contributing-to-semgrep-rules-repository/#semgrep-registry-rule-requirements) for more information.
To **create a PR** from the Semgrep Editor:
Click **Share**.
(Optional) Click **Publish to Registry**.
Fill in the required and optional fields.
Click **Continue**, and then click **Create PR**.